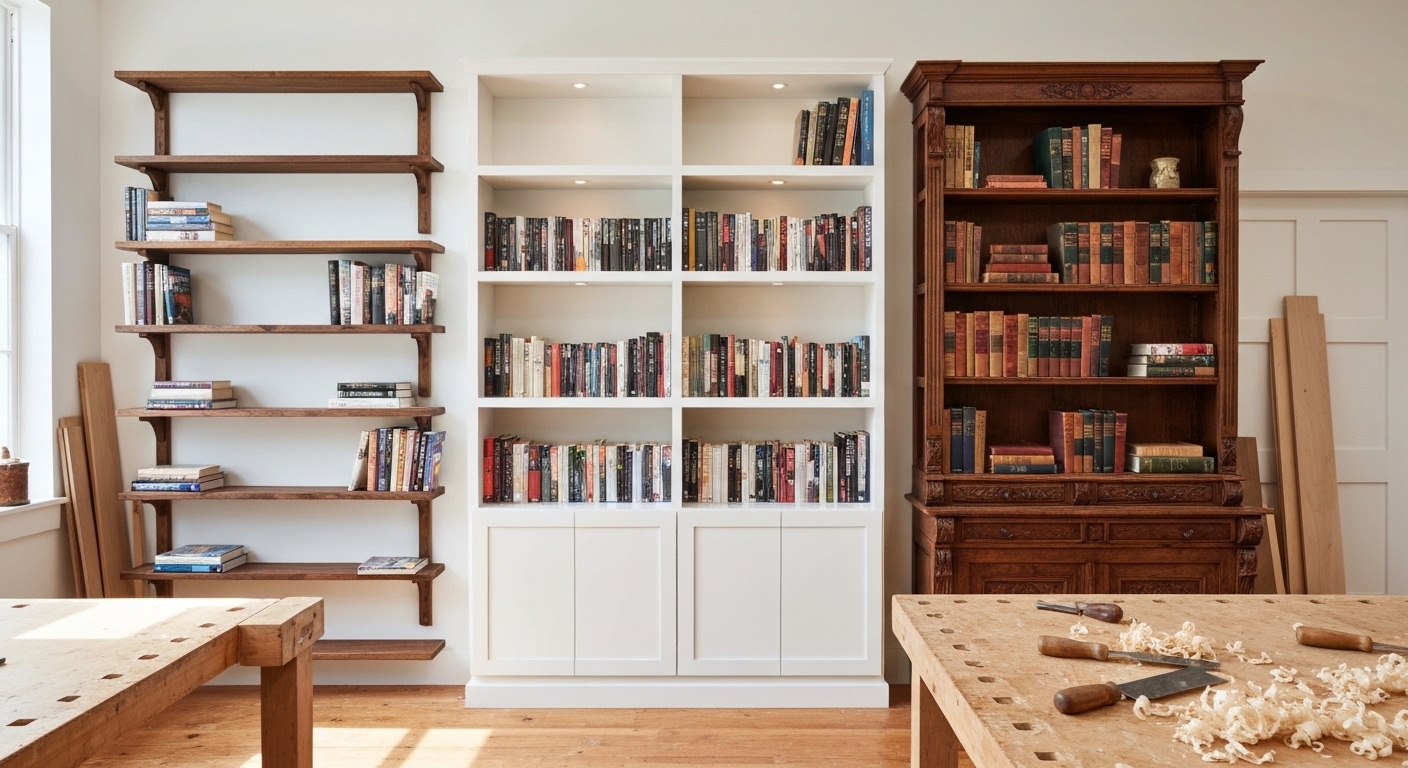
DIY Bookshelf Plans for Every Skill Level
Three complete bookshelf designs from beginner to advanced: a simple board-and-bracket shelf, a mid-century modern bookcase, and a floor-to-ceiling built-in. Full plans, cut lists, and step-by-step instructions.
One Piece of Furniture, Three Skill Levels
A bookshelf is one of the most satisfying things you can build. It’s functional from day one, it shows off your growing skills, and it becomes a permanent fixture in your home. Unlike a cutting board or a small box, a bookshelf is real furniture — and building real furniture is a milestone every woodworker should chase.
This guide presents three bookshelf designs, each targeting a different skill level. Start wherever your experience puts you, or build all three as you progress. Every design includes a full materials list, cut list, and step-by-step instructions.
Design 1: Board-and-Bracket Wall Shelf (Beginner)
Skill level: Beginner Time: 2-4 hours Cost: $50-80 Tools needed: Circular saw, drill/driver, sander, level, stud finder
This is the fastest path to a functional bookshelf. Solid wood shelves mounted on decorative metal brackets — clean, modern, and strong enough to hold a serious book collection.
Materials
| Piece | Quantity | Dimensions | Material |
|---|---|---|---|
| Shelves | 3 | 3/4” x 9-1/4” x 36” | 1x10 pine or poplar |
| Shelf brackets | 6 | 10” lip brackets | Steel or iron |
Recommended brackets: Heavy Duty Shelf Brackets, 10-inch, 6-pack — Matte black steel, industrial look, rated for 150 lbs per pair.
Step-by-Step
1. Cut and prepare the shelves. Cut three lengths of 1x10 to 36 inches. Sand all faces and edges through 120 and 220-grit. Ease the front edges with a sanding block or router with a roundover bit for a more finished look.
2. Apply finish. Finish the shelves before mounting. Two coats of Danish oil or a light stain plus polyurethane both work well. Allow the finish to fully cure.
3. Plan the layout. Decide on vertical spacing between shelves. For standard books, 10-12 inches between shelves works well. For art books or taller items, go to 14-16 inches. Mark the bracket positions on the wall using a level.
4. Locate studs. Use a stud finder to locate wall studs. Each bracket should ideally be mounted into a stud for maximum strength. If a stud doesn’t align, use heavy-duty toggle bolts rated for at least 50 lbs each.
5. Mount the brackets. Starting with the bottom shelf, hold one bracket at the marked position and level it. Drill pilot holes, then drive the mounting screws. Mount the second bracket 24-28 inches from the first (measured center to center). Use a level across both brackets before tightening fully.
6. Set the shelves. Place each shelf on its bracket pair. The back of the shelf should sit flush against the wall. Drive short screws up through the bracket holes into the bottom of the shelf to secure it.
Design Tips
- Stagger the shelves at different lengths (36”, 30”, 24”) for a more dynamic, modern look.
- Use hardwood (walnut, white oak, cherry) instead of pine for a premium appearance. The cost goes up to $100-150 but the result is dramatically more impressive.
- Mix with other elements — alternate shelves with framed art, plants, or decorative objects for a curated gallery wall effect.
Design 2: Mid-Century Modern Freestanding Bookcase (Intermediate)
Skill level: Intermediate Time: 8-12 hours Cost: $120-200 Tools needed: Circular saw or table saw, drill/driver, router (optional), clamps, sander, pocket hole jig or doweling jig
This design takes inspiration from mid-century modern furniture: clean lines, tapered legs, and an open feel. The bookcase is 48 inches tall, 30 inches wide, and 10 inches deep — sized to hold a substantial collection while fitting against any wall without dominating the room.
Materials
| Piece | Quantity | Dimensions | Material |
|---|---|---|---|
| Side panels | 2 | 3/4” x 9-1/4” x 48” | 1x10 select pine or plywood |
| Shelves | 4 | 3/4” x 9-1/4” x 28-1/2” | 1x10 select pine or plywood |
| Back panel | 1 | 1/4” x 30” x 48” | 1/4” plywood or hardboard |
| Tapered legs | 4 | 1-1/2” x 1-1/2” x 6” | Hardwood or pre-made tapered legs |
| Leg mounting plates | 4 | Steel hanger bolt plates | Hardware |
Plywood option: If you want a cleaner look with no knots, use 3/4” birch plywood for the sides and shelves and apply iron-on edge banding to cover the plywood edges.
Pre-made legs: Mid-Century Modern Tapered Furniture Legs, 6-inch, 4-pack — Solid wood, pre-finished, with hanger bolt and mounting plate included.
Cut List
| Piece | Qty | Length | Width | Thickness |
|---|---|---|---|---|
| Side panels | 2 | 48” | 9-1/4” | 3/4” |
| Shelves | 4 | 28-1/2” | 9-1/4” | 3/4” |
| Back panel | 1 | 48” | 30” | 1/4” |
Step-by-Step
1. Cut all pieces to size. Accuracy matters here — every shelf needs to be exactly the same length for the bookcase to be square. Cut all four shelves at once if your saw allows it, or cut one perfect piece and use it as a template to mark the others.
2. Cut dadoes for the shelves (recommended) or drill pocket holes (easier).
Dado method (stronger, cleaner): Using a router with a 3/4” straight bit and a straight-edge guide, cut a dado across the inside face of each side panel at each shelf position. Make the dadoes 1/4” deep. Mark your shelf positions at:
- Bottom shelf: 1/2” from the bottom edge (this shelf sits flush with the base)
- Second shelf: 13” from the bottom
- Third shelf: 25-1/2” from the bottom
- Top shelf: 38” from the bottom (doubles as a display surface if you leave the top open)
Pocket hole method (easier): Skip the dadoes. Instead, drill two pocket holes on each end of every shelf, on the underside. You’ll assemble the shelves to the side panels using pocket screws.
3. Cut the back panel rabbet. Using a router with a rabbeting bit, cut a 1/4” deep x 3/8” wide rabbet along the back inside edge of both side panels. The 1/4” plywood back panel will sit into this rabbet for a flush fit.
If you don’t have a router, skip the rabbet and simply nail the back panel to the back edges of the case after assembly.
4. Sand all pieces. Sand all surfaces through 120 and 220-grit before assembly. Pay extra attention to the shelf tops and the inner faces of the side panels — these are the visible surfaces and they’re much harder to sand once the case is assembled.
5. Assemble the case.
If using dadoes: Apply glue to the dadoes on one side panel. Insert all four shelves into the dadoes. Apply glue to the dadoes on the second side panel and fit it over the shelf ends. Clamp across the case at each shelf position. Check for square by measuring the diagonals.
If using pocket holes: Stand one side panel on edge. Position the bottom shelf at the marked location. Clamp it in place, then drive the pocket screws. Repeat for each shelf, working from bottom to top. Attach the second side panel last.
6. Attach the back panel. Once the glue is dry (at least 2 hours for dadoes), fit the 1/4” back panel into the rabbet (or against the back edges). Secure with 3/4” brad nails or small screws every 6-8 inches around the perimeter and into each shelf edge.
The back panel is structural — it squares the case and prevents racking. Don’t skip it.
7. Attach the legs. Flip the bookcase upside down. Install the hanger bolt mounting plates at the four corners, inset about 1/2” from the edges. Thread the legs into the plates. Flip the bookcase upright and check that it sits level on the floor. Adjust individual legs if needed.
8. Apply finish. The mid-century look calls for a natural or warm-toned finish. Two to three coats of Danish oil in Natural or Medium Walnut is authentic to the style. For a more durable finish, follow the oil with two coats of water-based polyurethane.
For a painted version, prime with a high-adhesion primer and apply two coats of semi-gloss paint. White, navy, forest green, and mustard yellow all work beautifully with tapered legs in a natural wood tone.
Design Tips
- Vary the shelf spacing to accommodate different book sizes. One tall section (14-15 inches) for art books, the rest at 10-12 inches for standard books.
- Angle the side panels by cutting a 5-degree taper from top to bottom. This creates a subtle A-frame shape that looks striking and is surprisingly stable.
- Add a solid wood top that overhangs the sides by 1/2 inch on each side and the front. This gives the bookcase a more finished, furniture-like appearance.
Design 3: Floor-to-Ceiling Built-In Bookcase (Advanced)
Skill level: Advanced Time: 16-24 hours (spread over a weekend or two) Cost: $200-400 Tools needed: Table saw, circular saw, router, drill/driver, level, clamps, pocket hole jig, brad nailer (highly recommended), caulk gun
A built-in bookcase transforms a room. It looks custom, it maximizes storage, and it adds significant value to your home. This design fills an 8-foot wall from floor to ceiling with adjustable shelving, a face frame, and crown molding. It looks like it was installed by a professional cabinet maker.
The secret is that it’s built from plywood boxes, dressed up with a face frame and trim. The plywood is the structure; the face frame and molding are the beauty.
Materials
This materials list assumes a standard 8-foot ceiling and a 6-foot wide wall section. Adjust quantities to your specific dimensions.
| Piece | Quantity | Dimensions | Material |
|---|---|---|---|
| Side panels | 2 | 3/4” x 11-1/4” x 93” | 3/4” birch plywood |
| Center divider | 1 | 3/4” x 11-1/4” x 93” | 3/4” birch plywood |
| Top and bottom | 2 | 3/4” x 11-1/4” x 70-1/2” | 3/4” birch plywood |
| Adjustable shelves | 8-10 | 3/4” x 10-3/4” x 34-1/2” | 3/4” birch plywood |
| Back panels | 2 | 1/4” x 35-1/4” x 92-1/4” | 1/4” birch plywood |
| Face frame stiles | 3 | 3/4” x 1-1/2” x 93” | 1x2 select poplar or hardwood |
| Face frame rails | 2 | 3/4” x 1-1/2” x 69” | 1x2 select poplar or hardwood |
| Base board | 1 | 3/4” x 3-1/2” x 72” | 1x4 select or base molding |
| Crown molding | 1 | 72” + returns | Crown molding profile |
Hardware
- Shelf pins, 1/4”, 50-pack
- 1/4” shelf pin jig
- 1-5/8” pocket hole screws
- 1-1/4” brad nails
- 2-1/2” screws (for wall mounting)
- Wood filler
- Paintable caulk
- Primer and paint
Step-by-Step
1. Plan your layout. Measure the wall carefully. Note the ceiling height, the width available, and any outlets, switches, or vents that need to be accommodated. Draw a full-scale plan on paper or use a free tool like SketchUp.
Pro tip: Measure the ceiling height in multiple places — old houses often have ceilings that aren’t perfectly level. Use the shortest measurement as your panel height and plan to scribe the top to the ceiling.
2. Cut the plywood panels. A table saw with a good fence is ideal for ripping the plywood panels to 11-1/4” width. For the length cuts, use a circular saw with a track guide.
Cut all pieces according to the cut list. Label everything.
3. Drill shelf pin holes. Using a shelf pin jig (a Kreg Shelf Pin Jig is the easiest option), drill two columns of 1/4” holes on the inside face of each side panel and both faces of the center divider. Space the holes 1-1/4” apart, starting about 8 inches from the bottom and ending about 12 inches from the top.
Drill to a consistent depth — about 1/2 inch. Wrap tape around your drill bit as a depth stop.
4. Cut the back panel rabbets. Route a 1/4” deep x 3/8” wide rabbet along the back inside edge of both outer side panels. The back panels will sit into these rabbets.
5. Assemble the carcase. This is a two-section bookcase joined by the center divider.
Start with the bottom panel. Apply glue and drive pocket screws (or use screws from outside if the side will be against a wall) to attach one side panel to the end of the bottom panel. Attach the center divider at the midpoint. Attach the second side panel to the other end.
Now attach the top panel across the tops of all three vertical pieces in the same way.
Check for square by measuring diagonals within each section. Adjust before the glue sets.
6. Attach the back panels. Fit the 1/4” plywood backs into the rabbets (or against the back edges). Nail in place with 3/4” brad nails every 6 inches around the perimeter and into the center divider. The back panels are critical for squareness and rigidity.
7. Stand the unit and secure to the wall. With a helper, stand the bookcase upright and push it against the wall. Use a level to check for plumb on the sides. Shim the base as needed if the floor isn’t level.
Drive 2-1/2” screws through the back panel into wall studs. Use at least four screws per stud you can hit, distributed top and bottom. A floor-to-ceiling bookcase loaded with books weighs hundreds of pounds — wall mounting is not optional.
Safety warning: An unsecured tall bookcase is a serious tip-over hazard, especially in homes with children. Always anchor to wall studs.
8. Build and attach the face frame. The face frame covers the plywood edges and gives the bookcase a finished, built-in appearance.
Cut the stiles (vertical pieces) and rails (horizontal pieces) to size. Join them with pocket holes drilled on the back side. Glue and nail the face frame to the front edges of the plywood carcase using 1-1/4” brad nails.
9. Install base molding. Attach base molding (or a simple 1x4 board) across the bottom front and returns on the sides if the bookcase doesn’t span wall-to-wall. Nail in place with brad nails.
10. Install crown molding. Crown molding at the top transforms the bookcase from “furniture against a wall” to “built-in that belongs here.” Cut the crown at the appropriate angle (usually 45-degree miters at the returns) and nail it to the top of the face frame and into the ceiling.
If you’ve never cut crown molding, practice with scrap first. Getting the angles right takes some trial and error.
11. Fill, caulk, and sand. Fill all nail holes and pocket hole plugs with wood filler. Let it dry, then sand smooth. Caulk the seam where the bookcase meets the wall and ceiling — this is what makes it look truly built-in.
12. Prime and paint. For a built-in, paint is almost always the right finish. It hides the plywood grain and gives a unified, architectural look.
Apply one coat of high-adhesion primer (like Zinsser BIN). Sand lightly with 220-grit after priming. Apply two coats of semi-gloss or satin paint. White is classic, but dark colors (navy, dark green, charcoal) make books and objects pop.
13. Cut and install adjustable shelves. Cut the shelves 1/8” shorter than the opening width to allow easy installation and removal. Apply edge banding to the front edge of each shelf.
Insert shelf pins at the desired heights and set the shelves in place.
Design Tips
- Vary the section widths if the wall allows. A wider section (42”) paired with a narrower section (30”) creates visual interest.
- Add lighting. Battery-powered LED puck lights installed at the top of each section illuminate the shelves beautifully. Or run wiring for recessed LED strip lights.
- Include a cabinet section. Close off the bottom 18-24 inches of one section with doors for hidden storage. Use concealed European hinges for a clean look.
- Customize for your collection. Measure your tallest books and space at least one shelf section to accommodate them. Include one section with 7-8 inch spacing for paperbacks to maximize capacity.
Choosing Your Build
| Board-and-Bracket | Mid-Century | Built-In | |
|---|---|---|---|
| Time | 2-4 hours | 8-12 hours | 16-24 hours |
| Cost | $50-80 | $120-200 | $200-400 |
| Skills needed | Cutting, sanding, drilling | Joinery, finishing, routing | All of the above plus trim work |
| Portability | Stays on the wall | Moves with you | Stays with the house |
| Book capacity | 40-60 books | 80-120 books | 200-400 books |
| Wow factor | Moderate | High | Very high |
Final Thoughts
Every woodworker should build at least one bookshelf. It’s the project that proves you can make real, functional furniture — something your family uses every day and that guests notice when they walk in the room.
Start with the bracket shelves this weekend. When you’re ready for more, the mid-century bookcase is a rewarding step up. And when you’re ready to transform a room, the built-in is waiting.
No matter which design you choose, you’ll end up with the same satisfying result: a piece of furniture you built with your own hands, filled with things you love, in a room that feels more like home because of it.