How to Change a Tire: A Step-by-Step Guide That Could Save Your Day
Getting a flat tire is inevitable. Knowing how to change one is essential. This guide walks through every step — from pulling over safely to torquing the lug nuts — so you are never stranded.
Why Everyone Should Know This
It does not matter if you have roadside assistance. Cell signals die. Wait times can be two hours on a holiday weekend. You might be on a back road where a tow truck is not coming anytime soon. Knowing how to change a tire is one of those fundamental life skills that, when you need it, you really need it.
The entire job takes 15-30 minutes once you know what you are doing. The first time will take longer because you will be figuring out where your spare and jack are stored, but after that, it becomes routine. This guide covers everything from the moment you realize you have a flat to the moment you are back on the road.
Safety First — Before You Touch Anything
A flat tire is inconvenient. Getting hit by traffic while changing one is catastrophic. Safety comes first, always.
Pull over to a safe location. As soon as you notice a flat (wobbling, pulling, flapping sound, dashboard warning light), slow down gradually and look for the safest spot you can reach. An empty parking lot is ideal. A wide, flat shoulder works. Avoid curves, hills, narrow shoulders, and soft ground. If you are on a highway, take the next exit if you can reach it safely. Do not try to drive miles on a flat — you will destroy the wheel.
Turn on your hazard lights. Do this immediately, even before you start pulling over.
Apply the parking brake. Once stopped, engage the parking brake firmly. This prevents the car from rolling when you raise it on the jack.
Place wheel wedges or chocks. If you have them, place them behind the tires on the opposite end from the flat. Changing a front tire? Wedge the rear tires. Changing a rear tire? Wedge the fronts. If you do not have proper wedges, a brick, large rock, or even a thick piece of wood works.
Put on your reflective vest if you have one. If you are on any kind of road with traffic, visibility matters. Some roadside kits include a triangle reflector — set it 50 feet behind your vehicle.
What You Need (It Should Already Be in Your Vehicle)
Before you ever get a flat, take 10 minutes to locate everything in your car and make sure it is all there. Do it this weekend. Here is what you need:
- Spare tire — either a full-size spare or a temporary “donut” spare. Check the air pressure every six months. A flat spare is useless.
- Jack — every car comes with one, usually stored under the trunk floor, behind a panel, or under the rear seats (SUVs/trucks). It is typically a scissor jack.
- Lug wrench — the L-shaped or cross-shaped wrench that fits your lug nuts. Also stored with the jack.
- Vehicle owner’s manual — it shows the correct jack placement points for your specific car. This matters.
Nice to Have
- A flashlight (or your phone flashlight, but a real one is better)
- Gloves — changing a tire is dirty work
- A rain jacket or tarp to kneel on
- A torque wrench (for properly tightening the lug nuts afterward)
- A can of WD-40 (for stubborn lug nuts)
- A 2x6 piece of wood (about 12 inches long, to place under the jack on soft ground)
Step-by-Step: Changing the Tire
Step 1: Loosen the Lug Nuts (Before Jacking Up)
This is the step most people get wrong. You loosen the lug nuts while the tire is still on the ground, because the weight of the car prevents the wheel from spinning.
Remove the hubcap or wheel cover if you have one. Some pop off with the flat end of the lug wrench. Others have a bolt pattern.
Place the lug wrench on the first lug nut and turn it counterclockwise. “Lefty-loosey” applies here. You are not removing them yet — just breaking them loose. Turn each one about a quarter to half turn.
If the lug nuts will not budge, try these:
- Use your body weight. Position the wrench so you can step on it. Stand on the wrench handle and let gravity do the work. Bounce gently if needed.
- Spray with WD-40. Let it sit for five minutes, then try again.
- Use a breaker bar or a piece of pipe slipped over the wrench handle for more leverage. Never hammer on the wrench — you can round the nut or break the stud.
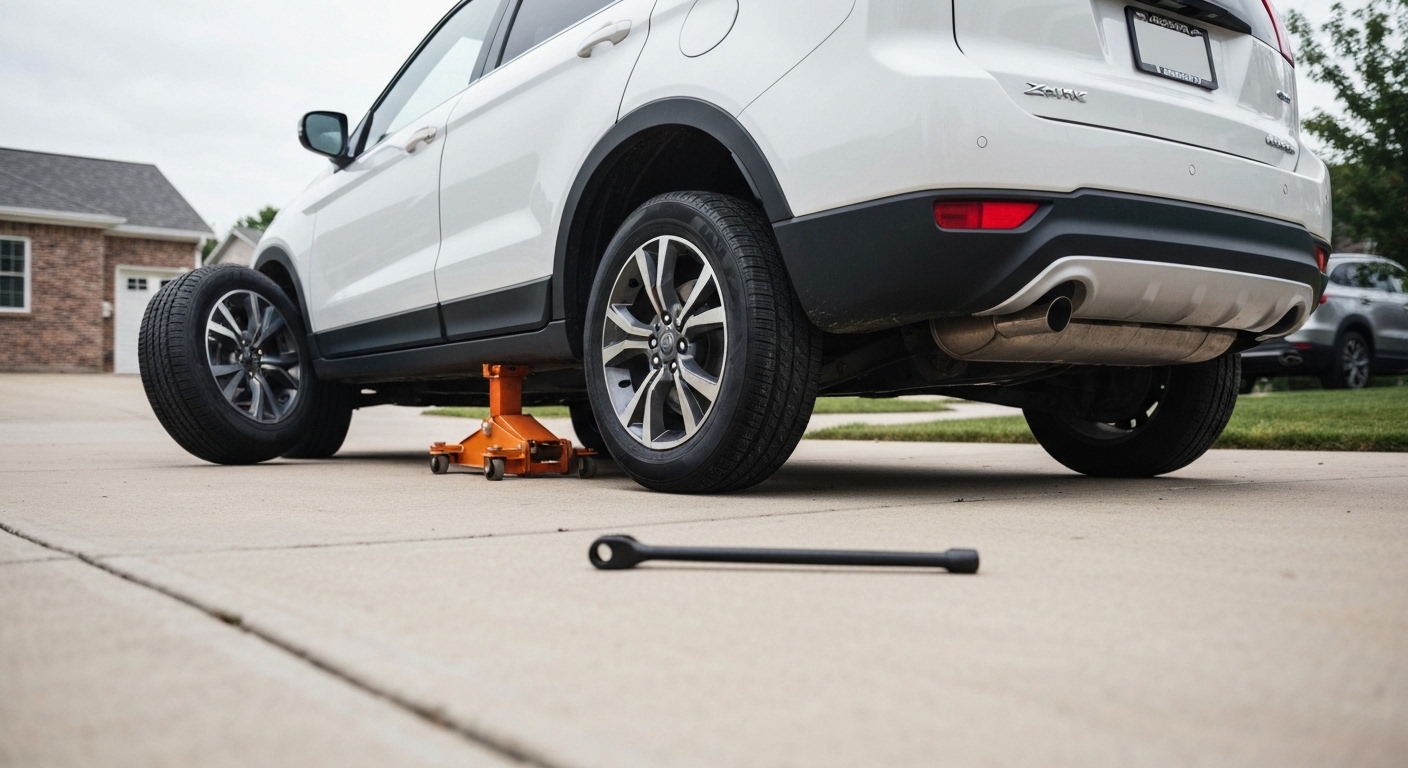
Step 2: Position the Jack
Consult your owner’s manual for the correct jack points on your vehicle. Every car has reinforced spots on the frame designed to support the jack. Placing the jack in the wrong spot can crush the rocker panel, damage the undercarriage, or cause the car to fall off the jack.
For most cars, the jack points are on the pinch weld — the seam along the bottom edge of the body, just behind the front wheels and just in front of the rear wheels. Many vehicles have small notches or arrows marking the spots.
If you are on soft ground (grass, dirt, gravel), place a piece of wood under the base of the jack to prevent it from sinking.
Step 3: Raise the Vehicle
Operate the jack according to its type:
- Scissor jack: Insert the wrench handle or rod into the jack mechanism and turn it. The jack will expand and lift the vehicle.
- Hydraulic jack: Pump the handle up and down.
Raise the vehicle until the flat tire is about 6 inches off the ground. You need enough clearance to remove the flat and put on the inflated spare, which will have a larger diameter.
Never put any part of your body under the vehicle while it is on a jack. Jacks are for lifting, not for holding. If you need to work under the car, use jack stands — but you do not need to get under the car for a tire change.
Step 4: Remove the Lug Nuts and the Flat Tire
Now finish unscrewing the lug nuts you loosened in Step 1. Remove them completely and put them somewhere you will not lose them — a pocket, a cup holder, or a small pile on the ground right next to you. Losing a lug nut on the side of the road is a bad time.
Grip the flat tire by the treads, pull it straight toward you, and set it aside. It will be heavier than you expect if you have never held a tire before. A standard passenger tire and wheel weighs 35-50 pounds.
Step 5: Mount the Spare Tire
Lift the spare tire and align the holes with the lug bolts. This is the physically hardest part of the job — you are holding a tire up while trying to thread it onto the bolts. A trick that helps: sit on the ground and use your foot or knee to support the tire while you line up the top bolt hole first.
Push the spare onto the bolts until the bolts come through the holes.
Step 6: Hand-Tighten the Lug Nuts
Thread the lug nuts on by hand, turning clockwise. Get them all on and finger-tight before you reach for the wrench.
Using the wrench, snug each lug nut down — but do not fully tighten yet. The wheel will want to spin because it is off the ground. You just need them snug enough that the wheel is seated flush against the hub.
Tighten in a star pattern, not in a circle. If you have five lug nuts, go 1, 3, 5, 2, 4. If four lugs, go 1, 3, 2, 4 (opposite corners). This ensures the wheel seats evenly against the hub.
Step 7: Lower the Vehicle
Lower the jack slowly until the tire touches the ground but the full weight of the vehicle is not on it yet. The tire should be resting on the ground but the car should still be partially supported by the jack.
Step 8: Fully Tighten the Lug Nuts
Now, with the tire on the ground preventing it from spinning, tighten the lug nuts all the way. Use the same star pattern. Put real effort into this — lug nuts need to be tight. Use your body weight on the wrench if needed.
The proper torque for most passenger vehicles is 80-100 ft-lbs. If you have a torque wrench, use it. If not, the “stand on the wrench” method provides enough force for most people.
Step 9: Lower the Vehicle Completely
Lower the jack the rest of the way and remove it from under the vehicle. Give the lug nuts one final check.
Step 10: Stow Everything
Put the flat tire, jack, and wrench back in the trunk. Do not leave them on the side of the road and do not leave them loose in the back seat where they become projectiles in a sudden stop.
What to Do After Changing the Tire
You are not done yet. A few important things:
If You Are on a Donut Spare
Temporary spares (donuts) have critical limitations:
- Do not exceed 50 mph. The tire is smaller and not rated for highway speeds.
- Do not drive more than 50-70 miles. Donut spares are designed to get you to a tire shop, not across the state.
- Do not use it for extended periods. Driving on a donut changes the differential behavior and can cause drivetrain damage over time.
- Your ABS, traction control, and stability control may not work properly because of the different wheel size.
Get to a tire shop as soon as possible. Either have the flat repaired (if it is a nail or screw in the tread — usually a $15-25 patch) or buy a replacement tire.
If You Are on a Full-Size Spare
You have more flexibility, but still get the lug nuts properly torqued with a torque wrench within 50 miles. Consult your owner’s manual for the exact torque specification — it varies by vehicle.
Check the Flat Tire
Look at why it went flat. A nail or screw in the tread is a simple repair. A sidewall puncture, a blowout, or a severely worn tire means you need a new one. A slow leak from a damaged valve stem is also a cheap fix.
Common Mistakes to Avoid
- Trying to loosen lug nuts after jacking up the car. The wheel just spins. Always loosen them on the ground first.
- Placing the jack in the wrong spot. Crushing the rocker panel or body panel is an expensive lesson. Check the manual.
- Not using the parking brake. A car rolling off a jack is dangerous and can damage the vehicle.
- Tightening lug nuts in a circle. Always use a star pattern to ensure the wheel seats evenly. Uneven seating can cause vibration, premature wear, or worse — the wheel coming loose.
- Driving on a donut spare like it is a regular tire. Speed limits and distance limits exist for a reason. Ignoring them risks a second blowout or drivetrain damage.
- Never checking the spare tire pressure. A spare that has been sitting in your trunk for five years might be completely flat. Check it twice a year when you check your other tires.
A Note on Run-Flat Tires and Tire Repair Kits
Many newer vehicles come with run-flat tires or tire repair kits instead of spare tires. If your car has run-flat tires, you can usually drive up to 50 miles at up to 50 mph after a puncture — enough to reach a service center. Check your owner’s manual for the specifics.
Some vehicles come with a tire inflation kit (sealant and a small compressor) instead of a spare. These work for small tread punctures but will not fix a sidewall blowout or a large gash. If the sealant does not work, you are calling for a tow.
If your car did not come with a spare and you want one, you can usually buy a spare tire kit (tire, jack, wrench, and mounting hardware) from the dealer or aftermarket. It is worth having, especially if you drive in rural areas.
Maintenance to Avoid Flats
- Check tire pressure monthly. Underinflated tires are more prone to punctures and blowouts. The correct pressure is on the sticker inside the driver’s door jamb, not on the tire sidewall.
- Inspect tires for wear. Use the penny test — insert a penny head-first into the tread. If you can see the top of Lincoln’s head, the tire is worn out. Replace it before it fails.
- Rotate tires every 5,000-7,500 miles. Even wear extends tire life and prevents premature failure.
- Avoid road hazards. Debris, potholes, and curbs all cause damage. That said, sometimes a nail finds you no matter what you do.
The Bottom Line
Changing a tire is a 15-30 minute job that every driver should know. It does not require strength (leverage does the work), it does not require special tools (they came with your car), and it does not require experience (you just need to follow the steps). The hardest part is the first time — after that, it is just procedure. Go check your trunk right now, find your spare and jack, and read the jack placement section in your owner’s manual. When you get a flat at 10 PM on a Tuesday in the rain, you will be glad you did.